Lately I have had the bright idea of actually sewing clothes that I would wear everyday, be comfortable in, and go together. An outfit.
Crazy radical I know and let’s not talk about how long it took me to get here.
Specifically I wanted something I could wear to pick the kids up at school, wear to go to the grocery store to get the one thing I meant to get last time but didn’t, or meet the mouse exterminator in.
Real life, my real life, clothes.
What I came up with, this time out, was the idea of a comfortable blazer, a sharper replacement for that old sweater with the pills on it that is a current tired day default, and some jeans-like unit.
I am on a sort of jeans/pants sewing tear at the moment, and am highly motivated by the fact I am getting sooo over skinny jeans. The truth is that if you are not yourself skinny you end up with long layers to cover it all and a midriff that feels more compressed than it deserves.
I have been eyeing Butterick 5926 for a while. It had some of the hallmarks of a good pattern, separate upper and under collar pieces, darts in the sleeves at the elbow to give shape, and larger pockets for the longer view and smaller ones for the shorter view – all indications someone was on the case when this was drafted.

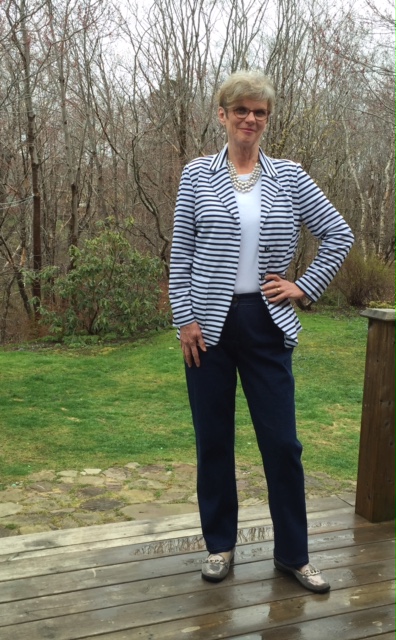
I made the longer view and used some navy and white striped knit pique I found at my local Fabricville. Interestingly I see Fabricville now has an online store so I can link directly to the fabric here so you can have a look.
Here is me in my version:
 |
| My best church lady pose. This was after the first take where my daughter kept saying “Mom you are always talking and gesturing in the pictures. Try to look more normal.” |
I am so happy with this pattern I am definitely going to be making it again. A simple classic but without all the work of tailoring and ten times less restricting to wear.
I made the size 14 as is with some construction changes.
These were:


I made corded buttonholes, which simply are buttonholes made by hooking a heavier thread like a buttonhole twist or pearl cotton over the back of the buttonhole foot and letting the machine stitch over the cord.
When the buttonhole is done simply pull on the free ends of cord, the back loop will be pulled under the bar tack at one end and hidden, and pull the free ends to the wrong side, knot and tie off.
A buttonhole made like this will not stretch out of shape:

And finally, I have to share the buttons. Love it when they match. It is just luck but I take credit for it:

Now onto the pants.
Since I am so newly committed to comfortable pants I have been looking for some version of “Mom” jeans. Yes, I know, but they are the new big thing (saw them all over Manhattan last month) and personally if anyone has earned the right to wear Mom jeans it’s me I figure.
I have had Butterick 6327 for a couple of months and been meaning to try it:

When I was down at Fabricville getting my blazer knit I spotted some very nice blue stretch denim, good quality, nice hand, and decided to just do it. I believe this is the fabric here.
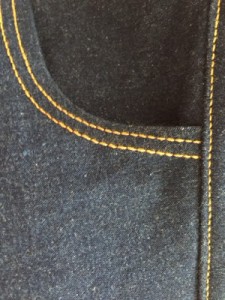
I really enjoyed the top-stitching:
Before you get any idea I know what I am doing I have to tell you I just threaded two spools of jeans top-stitching thread in my cover hem (you could do the same thing with a twin needle) so I cheated completely.
If you are wary about using a heavier thread like this in your machine don’t be. All you have to do is make sure you have an eye in the needle big enough for the thread to pass through easily. Look for something called a top-stitching needle. I used two in my cover hem machine and put another one in my regular machine when I had to do single line top-stitching.
The pattern went together very well and I didn’t have to make any alterations apart from taking in the back waistband 1 1/2″
Note that the waistband for the size 16 was nearly 36″ (mine is 34″ and the size 16 is supposed to be drafted for a size 30″ waist). It pays to measure the pattern sometimes before you cut. The crotch curve and hips were perfect though.
You can assess the fit from the photos yourselves but really the only major change I would make next time is to take out the hip curve a bit because my own hips are totally straight without any curve at all. I have in fact already done that to the pattern pieces because I am definitely making these again.
 |
| You can see exactly where I bent my right leg the curve I am going to be eliminating next pair. Not hard to do but really when there are no wrinkles anywhere else and the crotch was great right out of the envelope, why not? |
On the construction side the only really, really important thing I need to mention is that the pattern envelope calls for a 7″ zipper. This is really interesting because the fly extension is, without seam allowances, only 5″ long, a more standard length for zippers in women’s fly front jeans.
I of course discovered this when I went to put in my 7″ zipper which meant I actually had to do the last couple of top-stitches around the fly by hand to get it over the metal jeans zipper teeth. No surprise there are no close-up shots of that here. Ideally you should be able to place the fly front top-stitching just below where the zipper teeth end. This means, for the next person, you are going to have two choices, zipper wise:
1. Buy a 5″ and not a 7″ jeans zipper. Easy to do.
2. Lengthen the fly extension by 2,” Also easy to do.
All in all I am pretty pleased with myself.
I felt I took a chance with some nice fabric and two totally new patterns and got lucky. These are both basic staple type garments and they will get a lot of wear. I should probably do more of this type of sewing and continue to explore really day-to-day outfits that to my own mind at least look sharper than their comfort level suggests.