I hardly know anyone who doesn’t look forward to “sweater weather” after a hot, humid summer, and cozy weekend wear is just the thing to get me excited about a new season. This fall, my sewing plans took their inspiration from hygge. Hygge is the Danish and Norwegian word for―you guessed it―cozy, but it’s more than that. In Scandinavia, hygge means comfort and well-being. Hygge means creating an atmosphere of warmth and contentment. That’s the feeling I was looking for when I decided on patterns and fabrics for this season’s sewing. But I was also searching for a way to elevate simple leisure attire. After all, who wants just another sweatshirt?
Sweatshirts are usually made of—you guessed it—sweatshirt fabric. But what exactly is sweatshirt fabric?
The two most common fabrics for sweatshirts are brushed-back jersey and looped-back jersey. Single-knit jersey—what sweatshirt jersey usually is—curls to the right side when stretched, which can be helpful to know. It’s even more important when working with the fabric because when a pattern requires you to stretch one piece to fit another, all that curling can be problematic. I’ll get to that.
The other important aspect of fabric used to make sweatshirts is fibre content. For me, a polyester fabric for a sweatshirt just doesn’t make sense. Synthetic fibres like polyester lack the breathability you want for leisurewear and coziness to capture that hygge feeling. I wanted to create a slightly elevated sweatshirt that would give me that cozy feeling I was looking for, but I’d start with the design then select the fabric.
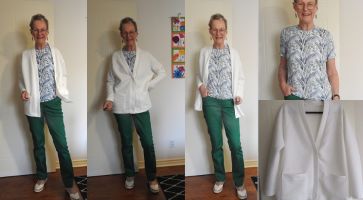
I began with several patterns and chose McCall’s 8343 because it offered a cross-over shawl collar neckline (view C) to elevate the design of the simple sweatshirt with banded sleeves and hemline. I then selected a jogging fleece (SKU: MD3904-021 $19.99) * and started.

Preparing to Sew
As usual, I began by preparing the fabric. Since I intend to machine wash and dry this garment, I put the entire length in the washing machine and into the dryer. It handled the preparation well, but there was one thing I hadn’t expected. I have never seen a fabric that created so much dryer lint!
I gave it a light pressing before laying it out. The first thing I noticed when I smoothed out the fabric to begin straightening the grain was that the selvedges were very uneven (see the photo below). This unevenness meant I’d have to be more careful looking for the grain lines through the weave. I couldn’t use the selvedge as a straight line.

Once I’d finished cutting out the fabric, I had to decide how to mark it. Using clips on the edges is fine, but those curling edges can be problematic. I decided to use wax tailor’s chalk. The one thing to remember with this kind of marking is that it does disappear when you iron over it. So, be aware.
Sewing the Pattern
The order of operations for this pattern is slightly different from those of a plain sweatshirt with a crew neckline, for example. Of course, as usual, I applied a stabilizer to the back shoulders and followed the instructions regarding placing a line of staystitching on the back neckline. Some sewists think this is nonsense when using a stretch fabric, but this neckline in this fabric will stretch out, and you’ll be glad you took that time to staystitch. Once that is done, you usually sew the front to the back at the shoulder seams. However, this pattern is a bit different because of the neckline.
Next up was the preparation and sewing of the shawl collar itself. The pattern calls for interfacing, which can seem odd when making a sweatshirt. However, I applied stretch interfacing as directed and then put the collar together.
Next, the collar is overlapped and attached to the front. If you’re not an experienced sewist, I might suggest you follow the instructions carefully at this point—and perhaps even if you are!
Once that was done, it was time to sew the shoulder seams and attach the collar to the back neckline. The approach to attaching this collar is a bit odd, requiring considerable hand-stitching—more than I like to see in leisurewear that will be washed regularly, but there doesn’t seem to be any way around this.
The band at the sleeve hems and the hemline are simple, but there is one thing to remember. The fabric stretches out of shape easily. As I stretched the bands to fit, the fabric had little recovery, resulting in a baggier hem and sleeves than I would have liked. However, I expect this to fix itself the first time it’s washed.
The Finishing
My goal was to create an elevated sweatshirt, which the collar itself does, but the finished garment needed more. Once the sweatshirt was finished, I realized the V-neckline dips quite low (perhaps I really needed to cut the small rather than the medium). I’m not a fabric stasher, but I love collecting interesting buttons. I had one left over from a previous project. It’s a hand-made button from a French artist, and it was just what this little sweatshirt needed to raise the deep V slightly and to add a bit of pizzaz.

I love the finished garment—so warm and soft. I’m now looking forward to colder weather so it can have its first outing! Happy sewing
You can read more about my sewing antics at www.gloriaglamont.com