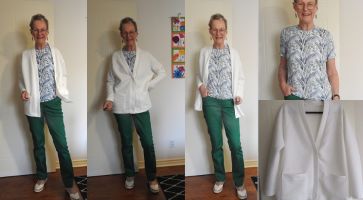
A roomy tote bag is the most useful bag in our wardrobe. In this blog post you will find notes and recommendations on how to sew a zippered, lined tote bag along with quick and simple ideas to customize the bag. I have written a complete review of the Butterick pattern B6188 including detailed images and my personal instructions to address glitches I noted in the pattern. You will also find 10 tips for dealing with heavyweight fabrics.
I am very proud to have the opportunity to write and share this post on the Fabricville blog for this tote bag.
Let’s start!

A zippered, lined tote bag is a staple for going to the library, grabbing small produce items at the grocery store or to quickly throw in our gym clothes….. and almost anything else.

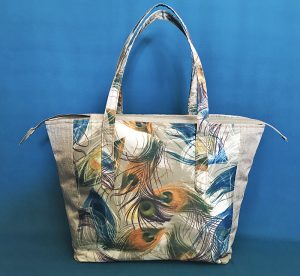
I chose to sew the tote bag version B of Butterick B6188.
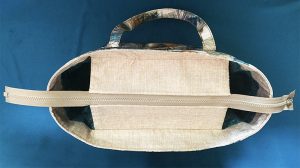
This tote bag has a zip top closure, an inner lining with a pocket and a practical flat bottom. The double handles are an ideal length (57 cm) so you can alternate carrying the bag on your shoulder or arm. I also find this tote bag to be a perfect medium size; width 54 cm x height 31 cm x debt 15 cm.
1- you need to know that the version B has only a partial zipper top closure.
2- The pattern suggests to buy a 55 cm long zipper but the purse closure only measures 26.5 cm. A 30 cm long zipper would suffice.
3- Before you choose the fabric for your tote bag you need to know your sewing machine strength. This pattern suggests twill or denim fabrics along with medium weight interfacing. Keep in mind that it will require a strong sewing machine to sew through multiple layers of thick fabrics.
For example, following the pattern instructions, I chose heavier fabrics for my purse (in the Fabricville Home Decor section) along with medium weight interfacing and some iron-on fusible vinyl for the bottom of the purse.
My regular domestic sewing machine couldn’t sew the top stitches through all the layers and was skipping stitches. I own another sewing machine that I needed to use for the heavier sewing tasks of the project.

Please be sure to choose your fabrics according to your sewing machine capacity. If you own a regular domestic sewing machine you could select a nice medium weight cotton fabric along with a light weight interfacing.

– Consider using heavy duty thread when sewing heavyweight fabrics. Cotton threads usually work better for thicker fabrics.
– Use a heavy duty 18/110 denim needle. These needles have a strong shaft and a very sharp point.
– If you have a walking foot or a Teflon foot, install it.
– Adjust your stitch length to a wider stitch.
– Adjust the machine tension until you sew without resistance. Be aware that on a domestic sewing machine it might be difficult to obtain machine stitches that look the same on both sides of the fabric.
– You will get a much more balanced stitch if you use ordinary thread in the bobbin, unless both sides of the stitching will show.
– When you test your stitches, test sew on 4 layers of fabric.
– Take your time and sew slowly. Roll the hand wheel for tricky areas.
– Tie thread ends, instead of back stitching.
– Hand press the seams before topstitching.
Below are the applicable links to buy these items from the Fabricville website.
– Tote bag front, back contrast and the handles: Collection Kitami, Style Alyson that you can purchase on site in a Fabricville near you. Online I would suggest a fabric from the Northcott line or a printed Drapery fabric.
– For the rest of the tote bag: Tweed solid that you can purchase on site in a Fabricville near you or I would suggest a solid Drapery fabric.
– Purse lining: Stonehenge cotton colour Qc-264 that you can purchase on site in a Fabricville near you. Online I would suggest a fabric from the Northcott Stone Henge collection.
– Thread: Coats & Clark Dual Duty Jeans topstitching
– Zipper: Costumakers 55cm colour kaki
– Fusible interfacing: Non woven medium weight (The pattern suggested sew-in interfacing for some parts of the purse, but I choose to use fusible for the entire purse).
– For the purse exterior bottom: HeatnBond Iron-on vinyl (This addition was my choice).
1- Be aware that this sewing pattern has a 1.3 cm seam allowance and not the usual 1.5 cm.
2- This pattern has many pieces to be cut in different fabrics.

To avoid any mistakes it is a good idea to separate your pattern pieces for each fabric.
3- If your choice of fabric for the purse front and back contrast has a large scale pattern, take the time to select which part of the pattern will look best in the center of the purse.

Pattern piece No 15 are the front and back contrast.
4- Your next step is to cut and sew-in and/or iron-on the interfacing onto each piece of fabrics.

If your fabric frays I recommend that right after you’ve sewn or ironed your interfacing to immediately finish all the raw edges with a serger or a zigzag stitch. (In my case the tweed fabric was fraying).
5- I used a piece of thin vinyl carpet for the purse bottom insert.
But even if you use a piece of cardboard you will need to remove about 3-4 mm all around the insert. You should also slightly round the 4 corners. Your insert will then fit perfectly flat at the bottom of the purse without bending.
1- I made the bottom of the purse waterproof by adding a fusible iron-on vinyl to the pattern piece No 8.
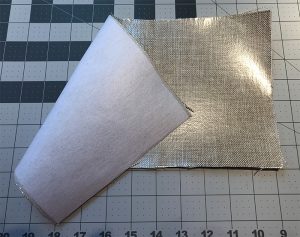
The wrong side has medium weight iron-on interfacing. The right side has iron-on vinyl (making it waterproof). Applying iron-on vinyl is tricky, ensure that your iron doesn’t get too hot.
2- I added a second pocket to the inner lining.
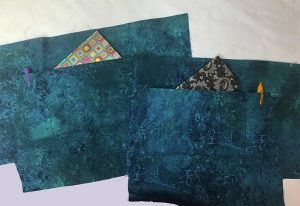
I had enough fabric to make and sew a second inner pocket for the other side of the bag. The pattern suggested to separate the pocket in 3 sections, but I preferred 1 bigger section for my cell phone or a sketch book and a smaller section large enough for 2 pens.
3- I decided to have fun and used my sewing machine decorative stitches.

I stitched a row of decorative stitches around the top part of the inner lining (4.7cm from the top edge). And I embroidered the word Petrichor (petrichor is the earthy scent produced when rain falls on dry soil), my favorite smell.
4- I decided to cut the bag handles in the same fabric than the contrast parts. (I didn’t like the tweed fabric against the contrast of the purse)……

…… because I liked how the jeans thread perfectly matched the Katimi fabric (I know, I’m fussy).
5- I didn’t sew the tabs on each side of the zipper (pattern piece No 17).
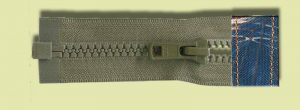
I chose a one way separating zipper because I like to have the purse fully opened for easy access.
There were a few places where the pictograms were lacking in detail. I hope that the below pictures will help you to better assemble the tote bag. The step numbers noted in my photos refer to the step numbers on the sewing pattern guide.

Stitch the purse closure top section sides together. At this stage this is how the zipper should be; upside down with the zipper cursor pointing down (that is also not well indicated on the pictogram).

At this stage, the lower edge facing (the wider part of pattern piece No 12) should be at the bottom and your zipper cursor should still be facing down so that when subsequently assembled/sewn the zipper cursor is facing up in the normal accessible position. (Another section on which I needed to use a seam ripper).

This is how you have to assemble the lower edge facing to the lining. Note that the zipper cursor is facing down.

If you have made your bag in a heavy fabric, ensure to leave the entire bottom of the lining open. You will need a wide opening to pass the bag through it.


I was deceived by the description of the bag on the sewing pattern. This is what is written on the back of the pattern envelope for the tote bag version B; has contrast front and back and zipper top opening. Thereafter the required notion tells us to buy a 55 cm long zipper and the picture of the actual bag shows the zipper hanging from both ends of the bag.
All of these cues led me to believe that the bag zip top closure was indeed, completely closing the bag from one end to the other. It’s only once I started assembling the pattern that I realized that the tote bag opening did not completely close the bag from end to the other.
Bottom line, if you want a tote bag with a complete zipper top closure SEW THE VERSION C or D. (The version A offers a small snap closure).
Before writing the review I used the purse for a few days. In my opinion the zipper was hard to open since the zipper is loose on both ends and not sewn to the bag frame. I needed to use two hands to unzip to access the bag contents. Not practical.

I then left the zipper open with the closure tabs pushed inside the purse. But the tabs were preventing me to access the inner pockets and the zipper ends were getting entangled with other items in the bag.
I ended up leaving the zipper closed and I would simply pass my hand through one of the side openings to fetch items in the bag. (Which made me think that if I could easily get access to what was inside my bag….. someone else could also have easy access to what is inside my bag……). In conclusion, in my opinion, from a security point of view this tote bag should only be used to carry non important items.
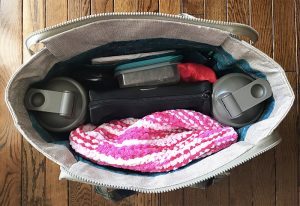
I love to use this bag for my daily outings. I found that the easy access to both sides of the bag makes it ideal to keep one liquid container on each end. I can stuff a snack, sweater, scarf, makeup pouch and or other items I need for the day in the middle and they help to keep the bottles of liquids standing up.
I really enjoyed doing this project. It was a good reminder to take the time to verify the included sewing pattern guide to completely understand the construction of the article you plan on sewing so as to make an informed decision.
Fabricville gave me the pattern and the notions needed to make this tote bag in exchange for me writing this post on their blog. I am very excited that my very first collaboration is shared with them since I always shop at Fabricville for my sewing projects. They truly have the best prices and a wide variety of fabrics and notions. Please note that the opinions expressed here are my own.
Thank you for passing by
Au revoir!