I have been eyeing up ready-to-wear jeans and have been quite taken with the novelty of barrel-leg versions. I will say that I have wanted to make a pair for quite some time, and when I saw the Fabricville stretch denim and the Everyday Blues collection, I decided it was time to make the leap.
These smartPattern Barrel Jeans had many options, so I dove in!


💡 TIP:
This pattern is designed primarily for non-stretch denim. If you use stretch (like I did), keep the added ease in mind when fitting and make sure to interface the waistband—otherwise it can grow over time.
The biggest feature of this pattern is the option to use the custom configurator.
You don’t just pick a size—you choose:
Then input your measurements, and the pattern is generated for you. You can choose from generic size versions as well, and this is a great option if your measurements align well with their size charts.
If you go for a custom pattern, be aware that the pattern is built entirely around your measurements, so accuracy matters. The fit you get is only as good as what you put in.
The barrel shape isn’t just “wide legs”—it’s engineered through structure:
There are very detailed instructions, including photographs and videos, on the smartPattern website. You can find them here.
Always prewash and dry denim before using. This removes any excess dye and ensures that any shrinkage happens before you sew your jeans.
You will print or use a projector for your PDF pattern. Then, cut out all pattern pieces, interface the waistband following the manufacturer’s instructions.
Begin by sewing the knee darts on the jeans, if that is an option you have chosen. I used two darts because I really liked the visual impact, and that is also why I chose to topstitch on both sides of the dart.
You will cut the front pocket facings from the main denim fabric. I finished the edges by serging and then topstitched them into place on the front pocket fabric.

Use the main denim fabric as the facing on the front inner pocket bags.
I like to use narrow twill tape to reinforce the pocket opening to prevent stretching out as the jeans are worn.
Sew the pocket bags to the pants and finish the pockets by using French seams or a serger.

You can use French seams or a serger to finish the pocket bags.
Finish the front pockets by topstitching the pocket opening.

Sew the fly shield, right sides together, then turn and press.
Trim front left, then attach the fly facing by stitching, then turning and topstitching
Finish the fly, following the pattern instructions. Detailed instructions can be found here.
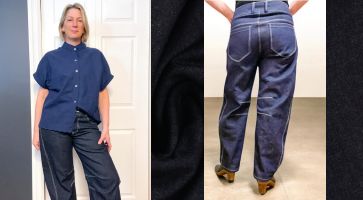
Your next step will be to add the side seam wedge insert. This gives shape to the barrel jeans. After this, the yoke pieces will be attached to the back legs of the jeans. The backs will be attached to the side wedges, and the jeans will then be joined at the crotch seam. Be sure to topstitch along the way

Jeans are ready for the belt loops and waistband.
Press and topstitch the belt loop fabric. cut into individual belt loop pieces and attach along the top of the jeans. This will happen BEFORE you attach the waistband.


Attaching the belt loops.

Checking the fit before attaching the belt loops and jeans buttons.
It’s a good idea to check the fit before adding the final details. Once I knew I didn’t require any further alterations, I attached the belt loops and added the back pockets. You can play around with trim, embroidery and topstitching designs if you want to really add some personality to your jeans.

You can use topstitching, trims or even embroidery if you want to customize the back pockets of your jeans.
I use an awl to poke a hole through the denim where the jean button will be attached. A hammer or mallet and a towel to cushion the button when attaching made light work of the no-sew button. The pliers were just handy in case I made a mistake and needed to remove a bent button application (which may have been the case on attempt #1).

Attaching the no-sew jeans buttons.


I love, love, love these jeans. I feel so fashion-forward, and they are just so comfortable. They were a really fun make with the topstitching details, the darts and the side panel for shaping. I’m excited about how these turned out, and I already have ideas for my next unique pair.