Hello fellow sewists,
The sunny days of spring have me wanting to spend more time outdoors, and sewing up activewear is the perfect motivation to get some exercise while enjoying the warmer weather.
I was elated to discover that Fabricville is now carrying PURELUX and DRYFLEX, which are Bluesign® approved fabrics. I did some research and the Bluesign® approval is the gold standard for sustainable textiles.
From the Fabricville website:
Bluesign® approved fabrics are made according to strict social, ethical and environmental standards.
Purelux is a super soft high-tech knit perfect for any kind of workout clothes. Its four-way stretch allows for extreme freedom of movement and its sweat-wicking properties will keep you cool and dry.
Dryflex is a high-tech microfiber perfect for Yoga/Pilates gear, its four-way stretch allows for extreme freedom of movement and its sweat-wicking properties will keep you cool and dry.
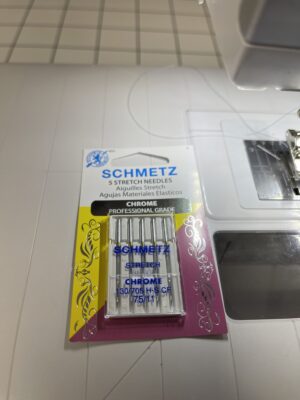
To sew these fabrics, I used Eloflex Stretch Thread to avoid popped stitches and give plenty of stretch to my seams. I also used Schmetz Chrome Stretch needles.
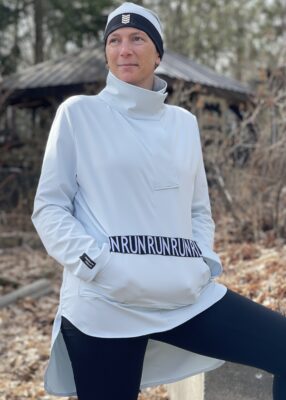
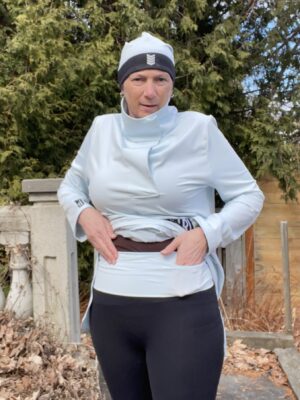
For getting active this spring, I made an outfit meant for walking and jogging in the great outdoors, with leggings, a ponytail hat and a waist belt to carry essentials like my phone. I will take you through the supplies and steps to creating this activewear outfit, and with a variety of colour options available at Fabricville, you can plan your own spring activewear outfit!
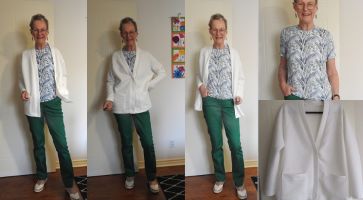
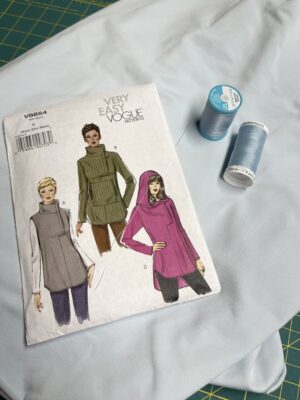
TUNIC TOP
Sewing Supplies
Fabric: 2 metres PURELUX in the Illusion Blue
Notions: Eloflex Stretch Thread Icy Blue
Pattern: Vogue 8854
Optional: kangaroo pouch pattern piece traced from another pattern or self-drafted, decorative trim or elastic for the top of the pocket
I decided that the PURELUX in the Illusion Blue colour would be appropriate for the blue skies of springtime, and the heavier weight would be great for a tunic top to wear over leggings when out walking or jogging.
Instructions
- Cut out pattern pieces for the options you prefer. I used the collar version with the View C longest length.
- Sew together the pattern as per the instructions. I used Eloflex stretch thread and a stretch stitch on my sewing machine. I then finished the edges with a serger.
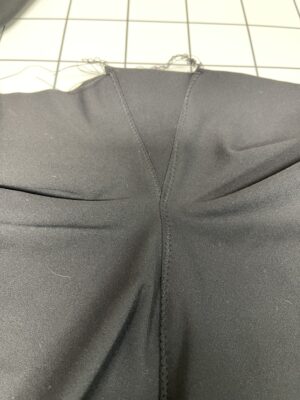
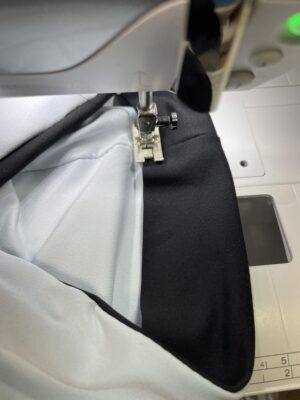
- When constructing the neck opening, take extra care and press frequently during the process to maintain the shape. Using this knit fabric with lots of stretch meant that I couldn’t skip the interfacing and pressing. Use an iron on low heat and a press cloth to press and pin into shape as you go.

Interfaced neck opening pressed and ready to stitch into place.
- I sewed the pocket on last because I changed the shape and wanted to check for placement by trying on the garment and pinning it in place before sewing. I drafted my own to have a traditional kangaroo pouch shape like ready-to-wear hoodies- I just traced off of a hoodie from my closet. Add seam allowances to all sides of the pocket piece.
- Hem the side openings of the pocket. Attach the top of the pocket by flipping the pocket piece up towards the collar right-sides together with the main fabric. This will hide the stitching at the top seam. Fold under the seam allowance for the sides and bottom of the pocket and topstitch into place.
- If desired, add a piece of trim to the top of the pocket. I used a piece of elastic from a previous project, and I suggest a trim with stretch to work well with the stretch of the fabric.
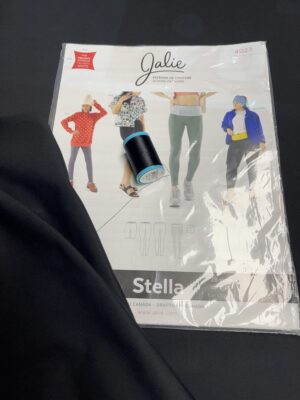
LEGGINGS
Sewing Supplies
Fabric: 2 metres DRYFLEX High Tech Micropoly in Black
Notions: Elastic for waistband sides, Eloflex Stretch Thread Black
Pattern: Sinclair Patterns Flex Leggings
This is my new favourite leggings fabric. It has a beautiful, soft matte finish (not shiny or slippery feeling) and has a beautiful stretch with great, firm recovery. My teen daughter swears that they feel exactly like the fabric in her VERY expensive RTW leggings from a Canadian citrus clothing company.
Because of the compressive nature of these leggings, I reinforced all my seams with the Eloflex stretch thread and serged the edges. This helps eliminate popped stitches in high-stress areas.
Instructions
- Cut out pattern pieces for the option(s) you prefer. I used the colorblock options for the thigh areas because this option allows for very functional thigh pockets. I did the high waistband with the back pocket (large enough to fit my big phone!)
- Sew together pockets – I suggest that you use the stretch stitch reinforcement throughout. I sewed the turned-over pocket top with the 3-stitch zig zag as I find this is excellent in high-stress areas.

- Sew pockets to the front and back leg pieces, then attach the gusset. This pattern has you cut out two gusset pieces and then sew them as one for extra reinforcement. I topstitched the gusset pieces with a zig-zag to keep the seams lying flat and for added strength.
- Sew waistband pieces together. The two side pieces are reinforced with elastic in the top seam allowance. I used swim elastic as this is very strong and has a great recovery stretch. I HATE when leggings slide down when I am active and I find the elastic here makes a big difference in keeping everything in place.
- Attach the waistband to the legs and then finish the bottom seam allowance. Put them on and take them for a spin!
ACCESSORIES: PONYTAIL HAT/BEANIE and WAIST BELT
Sewing Supplies
Fabric: DRYFLEX and PURELUX remnants from the top and leggings
Notions: Coordinating Eloflex Stretch thread
Pattern: Jalie Stella
These accessories are so quick to sew and I already have several requests for them as gifts. The hat has an optional hole for a ponytail, which I find is a must for physical activity. The waist belt has as many pocket slots as you wish, as you choose where you sew the stitching lines to define the different pocket areas (the whole belt is one giant pocket, so there is room for your phone, snacks, keys and more!)
Hat/Beanie Instructions
- Measure the circumference of your head and find the size that matches.
- Cut out the pattern pieces. I used the two colours from my top and leggings to coordinate with my outfit, and I had plenty of scraps left. By changing the construction and stitching the band to the outside of the hat, you will be able to use the contrasting colour as a design feature.
- Zig zag along the seam allowance of the marked opening for the ponytail to finish the edges. Stitch all sides of the hat as per the pattern instructions.
- Attach the band to the hat with the WRONG sides together along the bottom edge.

- Turn the band to the RIGHT side of the hat and topstitch into place.
Topstitch the band to the outside of the hat with stretch thread and/or a stretch stitch. This will allow the contrasting colour to show.
6. Ta Da! Completed hat with contrasting band and a hole for a ponytail!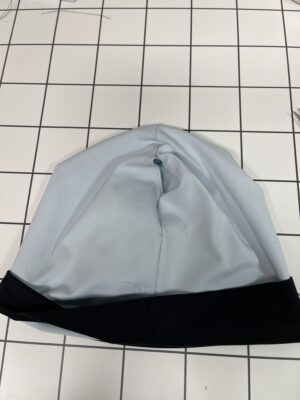

Waist Belt Instructions
- Cut out the single pattern piece for the waist belt (it is mind-blowing how easy this belt is to make, and how practical it is too!)
- Finish edges and fold the fabric along lines as indicated on the pattern pieces and the instructions. Add vertical stitching lines to create different size pockets in your belt. I used my phone measurements to be sure to create a pocket for my phone and then smaller sections for other small items like keys, gels etc. This is also perfect for anyone who needs to carry an inhaler with them when exercising.

Conclusion
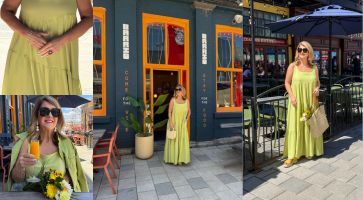
I have already tested my new activewear outdoors, and it is perfect for spring weather.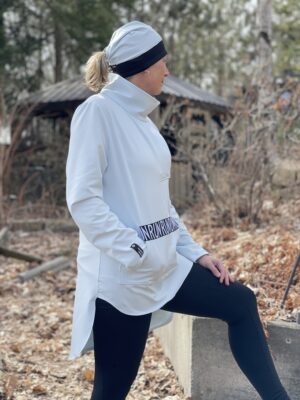
I can’t wait to see what everyone else creates with Bluesign® Purelux and Dryflex fabrics. They are soft, have great recovery, and they are better for the environment as well. Fabricville carries many colour options and I already have requests from family members to create activewear pieces for them. You definitely want to give these fabrics a try!
Happy Sewing!
Heather
@manitoulinthreads